
Do you want to detect speeding cars without having an expensive radar gun? 🚗📸
Me too - which is why I built an AI-powered virtual speed camera. It processes video footage of a road to detect cars using an AI model and calculates their speeds. An annotated video file is produced (with the car speeds overlaid on the cars) as well as a spreadsheet with the full statistics. This project turns any webcam or camera phone into a virtual speed camera.
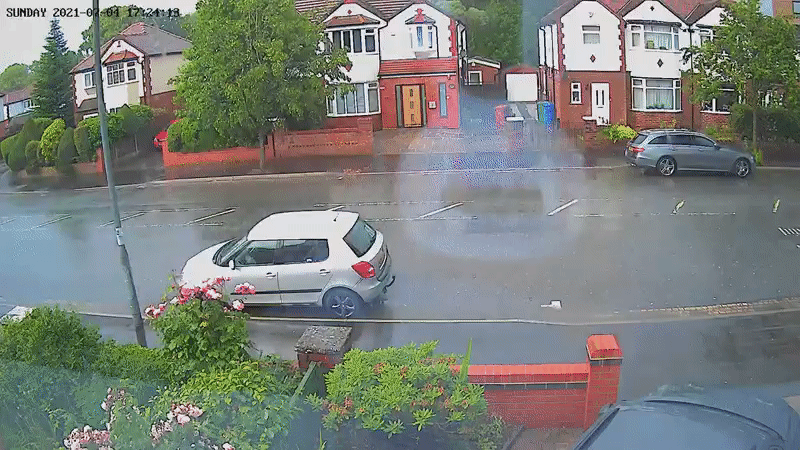
Here’s an example of the footage from the AI-Powered Speed Camera:
From having an idea this might be possible - it only took me a few weeks and ~300 lines of Python to create (thanks to Machine Learning cloud APIs and open-source video processing libraries). In this blog post, I’ll explain why I created it, how it works and how to use the software yourself.
Background
My Dad and Stepmother recently moved to a new house on a busy residential road in the Manchester suburbs. It soon became apparent that speeding was an issue in the local community. This particularly affected their road - which, despite being a 20 MPH, would regularly see people driving in excess of 50MPH.
In discussing how to petition their local council to install traffic calming measures - one idea came up that if they did a community speed survey it would provide evidence to push their claim that the road suffered from dangerous speeding and was an accident waiting to happen.
Looking into commercial radar guns (which can cost hundreds of pounds) - it was unfeasible to purchase one of these for a community speed watch project. Talking to my Dad I began to wonder if there was anything I do with machine learning to help - as I’d previously built other image recognition ML projects.
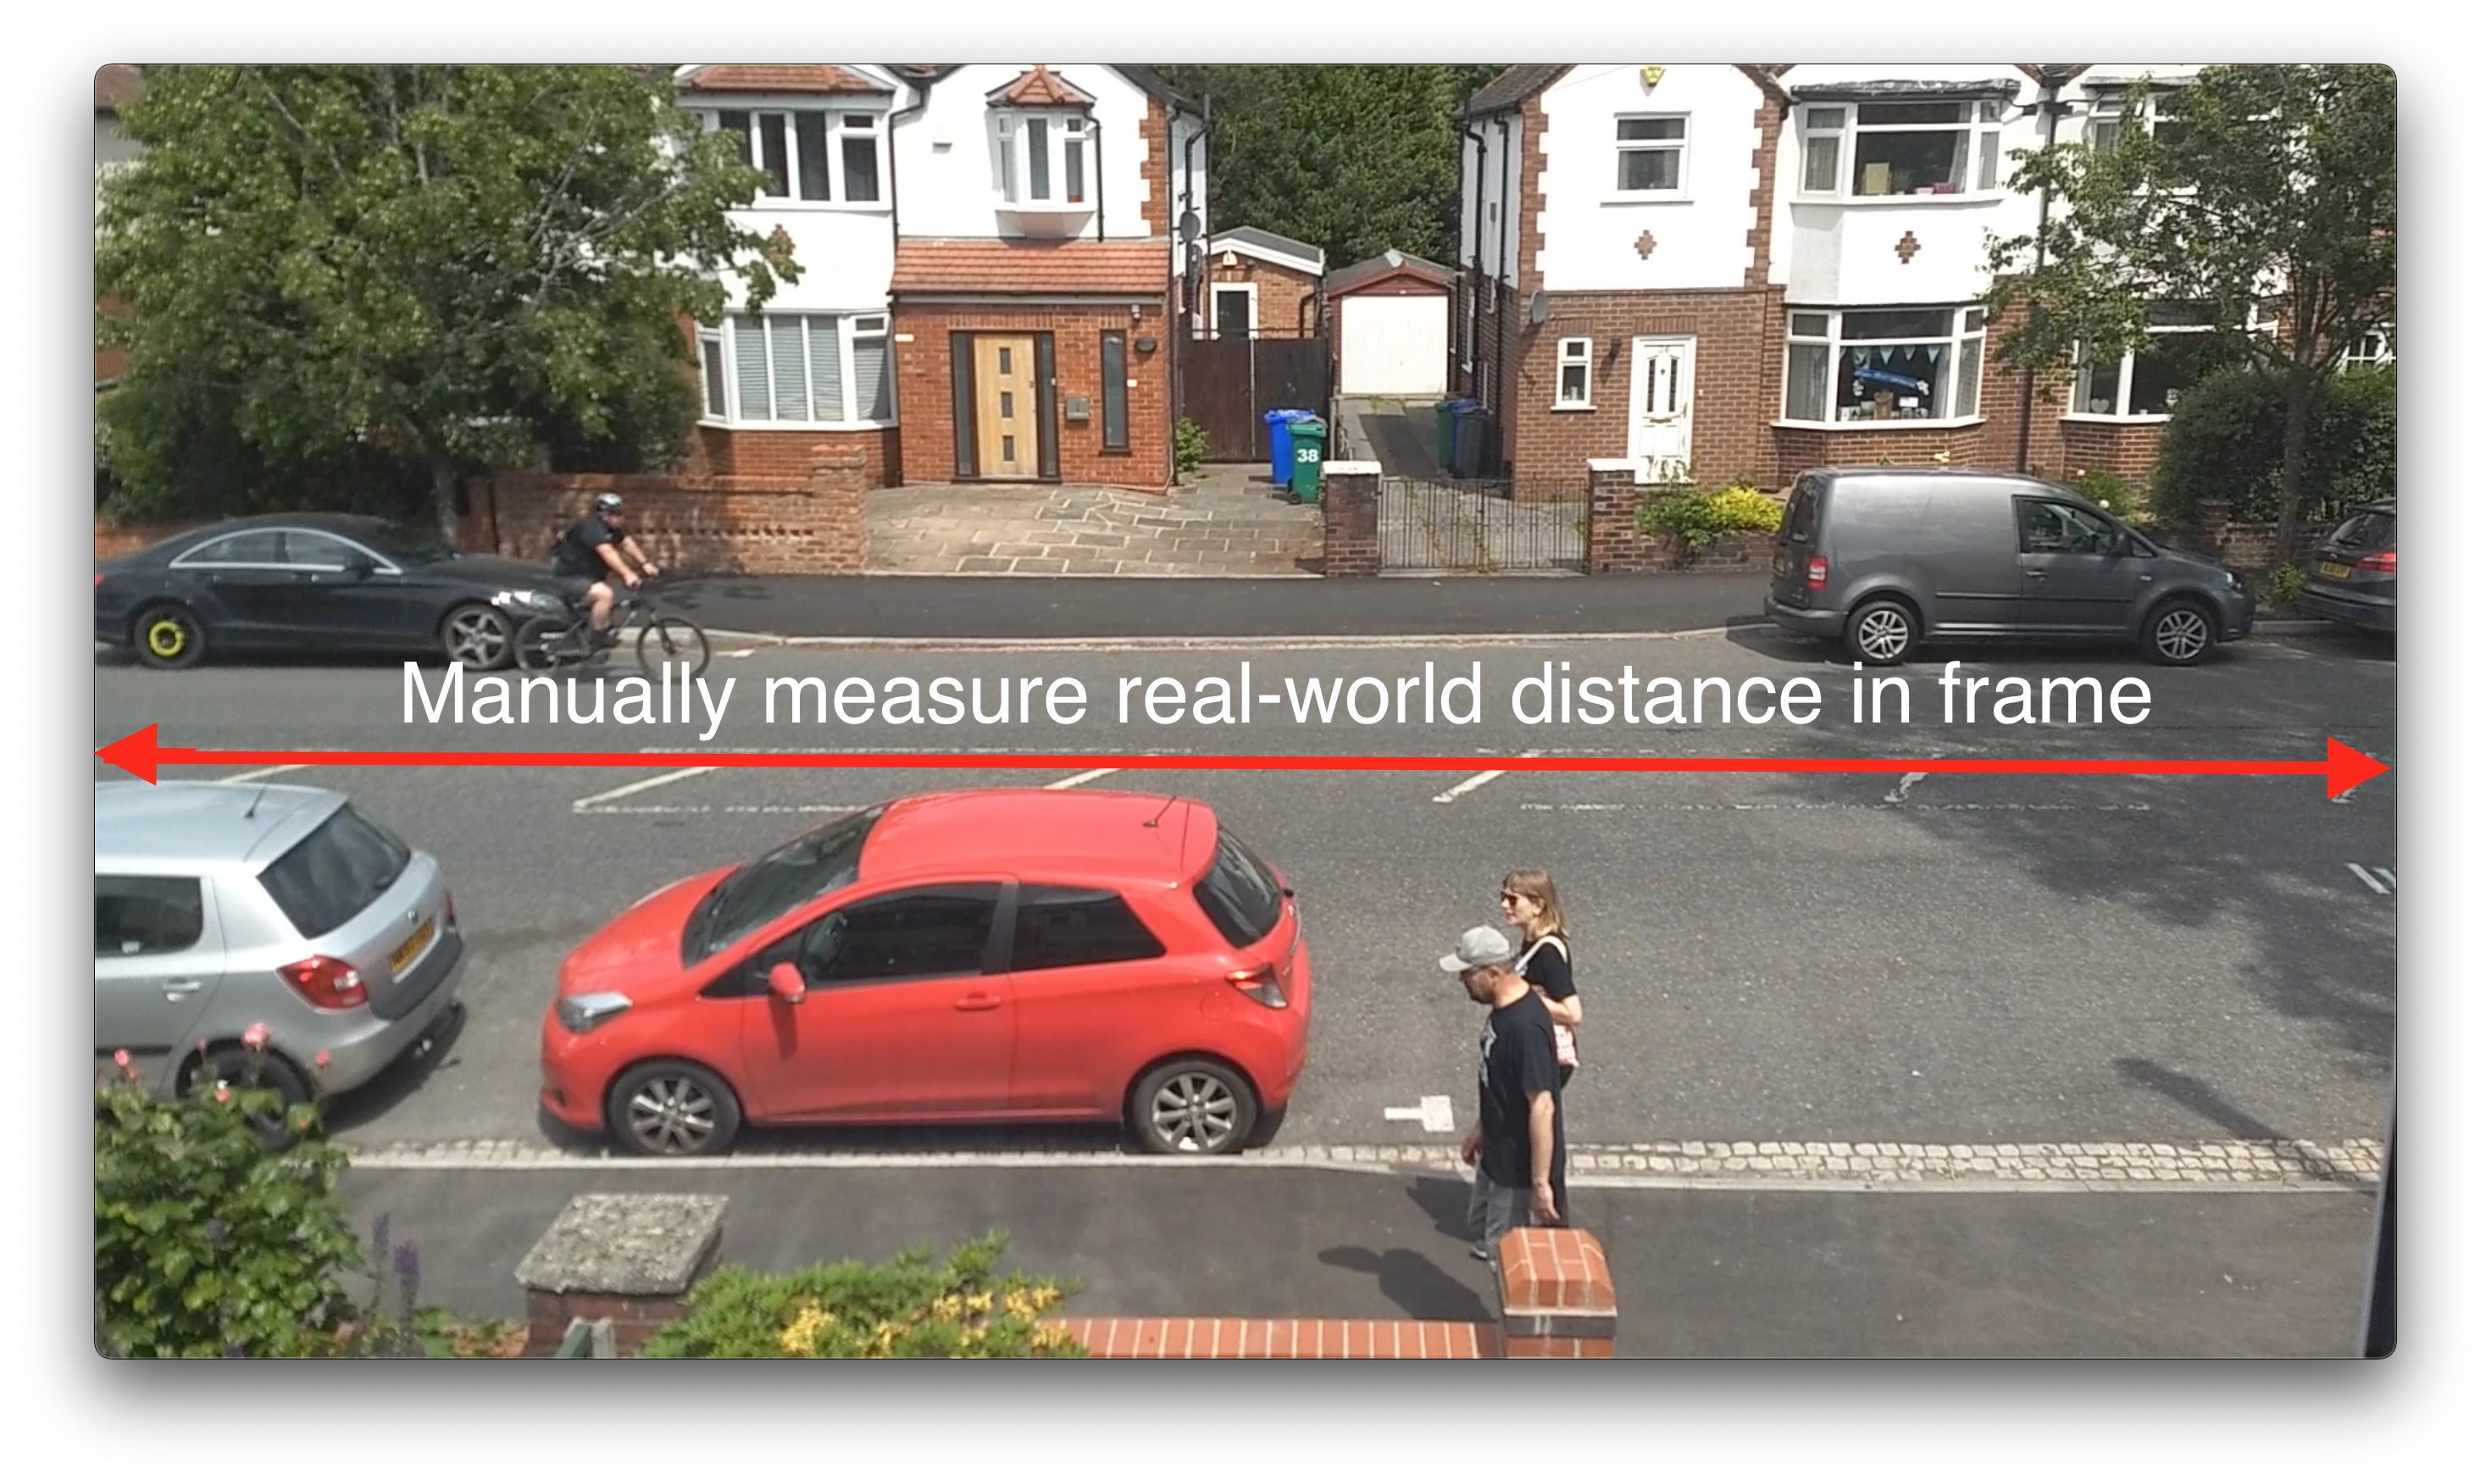
As my Dad’s house already had a CCTV system facing the road - I knew it would be simple to collect video footage of cars travelling along. As the camera viewpoint was fixed (and parallel to the road) - I could measure the road length in the frame to calculate distance travelled by cars. If I could then use an AI model to automatically detect and track cars throughout the footage - I could calculate vehicle speeds. The idea for an “AI-Powered Speed Camera” was born!
2022 Update: The results of community speed survey using this software was used to successfully persuade the council to install traffic calming measures on the road.
How It Works
Here are the steps I used in making this project…
- Collect video footage of the road to capture speeding cars.
- Use Google Cloud Video Intelligence API to track cars in video.
- Calculate speeds of detect cars using fixed road distance in frame.
- Produce annotated video with car speeds using FFMPEG.
- Generate spreadsheet with vehicle speed statistics in Python
Upload results to Reaper Drone to dispatch speeding vehicles (coming soon…)
If you’re a nerd like me and want to learn more about the details of each step - here you go…
Recording Video Footage of the Road
This is the easy bit. Any webcam or camera phone will do. Record footage from a viewpoint parallel to the road for enough time to capture speeding vehicles. The video frame position needs to be fixed for the duration of the footage. I used HD quality footage - I’m not sure what the accuracy will be like with lower video resolutions. Longer footage does need more Cloud API credits to process. Measure the distance along the middle of the road captured by the video frame.
Tracking Cars in Video Footage
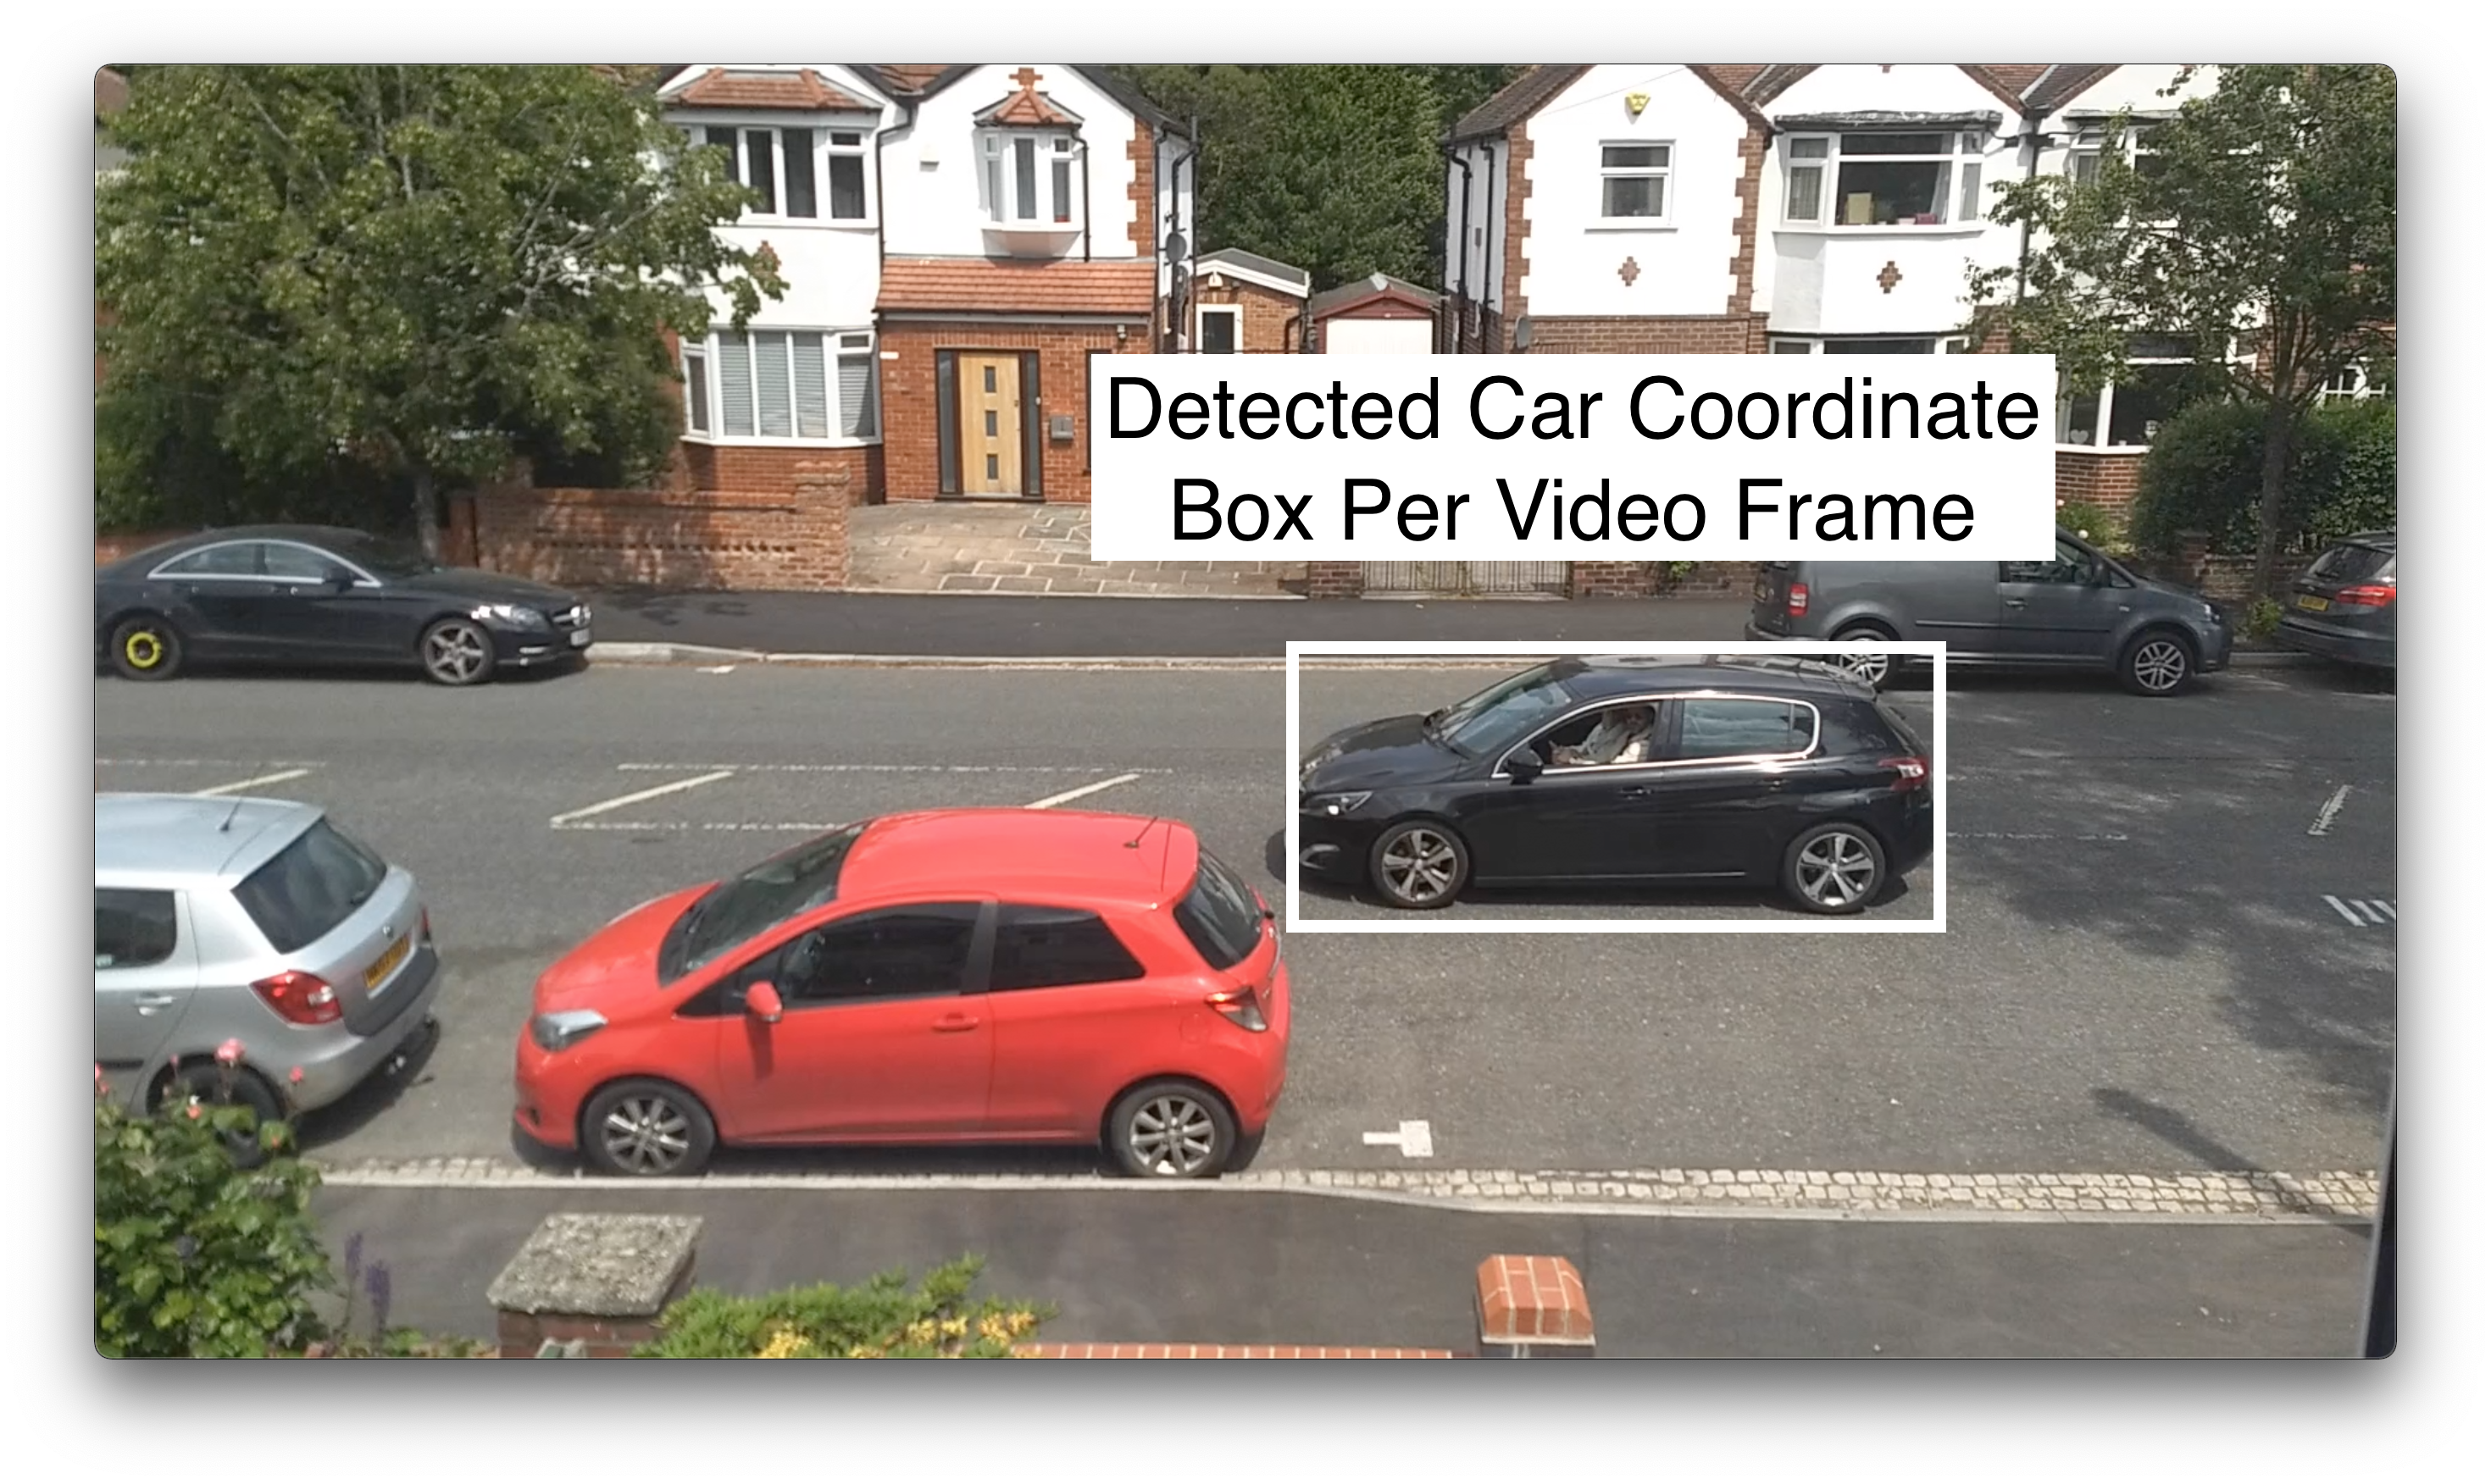
Conveniently, Google Cloud Video Intelligence API supports object tracking in video files. This saved me having to mess around with Tensorflow models on my local machine (and I could use the extensive processing power of GCP). The API returns a JSON file with classifications for objects detected and their positions in available frames.
Here are the steps needed to process a video file with this API:
-
Upload the video file to a Google Cloud Storage Bucket.
-
Create
request.jsonfile with JSON file containing video file bucket name.{ "inputUri": "gs://<BUCKET_NAME>/<VIDEO_FILE>.mp4", "features": ["OBJECT_TRACKING"] } -
Send HTTP request to Google Cloud Video AI API.
curl -X POST \ -H "Authorization: Bearer "$(gcloud auth application-default print-access-token) \ -H "Content-Type: application/json; charset=utf-8" \ -d @request.json \ https://videointelligence.googleapis.com/v1/videos:annotate -
HTTP response will contain a URL for the API results. Poll this URL until the results are ready.
https://videointelligence.googleapis.com/v1/projects/<X>/locations/REGION/operations/<Y> -
Save output from API result (when it is available) to a JSON file.
curl -X GET \
-H "Authorization: Bearer "$(gcloud auth application-default print-access-token) \
https://videointelligence.googleapis.com/v1/projects/<X>/locations/REGION/operations/<Y> > results.json
Calculating Speeds From Cars in Footage
This is sample JSON returned from the API for object tracking with video files. Objects detected in the video footage are available under the response.annotationResults.objectAnnotations path. Each object has a classification for the type of object (entity.entityId/description) and its position in detected frames (frames). For each frame the object was detected in - the coordinates of a normalised bounding box covering the object in that frame are available.
{
  ...
  "response": {
    "@type": "type.googleapis.com/google.cloud.videointelligence.v1.AnnotateVideoResponse",
    "annotationResults": [
      {
        "inputUri": "/driving-speed/dene_road.mp4",
        "segment": {
          "startTimeOffset": "0s",
          "endTimeOffset": "10.366666s"
        },
        "objectAnnotations": [
          {
            "entity": {
              "entityId": "/m/0k4j",
              "description": "car",
              "languageCode": "en-US"
            },
            "frames": [
              {
                "normalizedBoundingBox": {
                  "left": 0.7212495,
                  "top": 0.32746944,
                  "right": 0.9405163,
                  "bottom": 0.47839144
                },
                "timeOffset": "0s"
              },
              {
                "normalizedBoundingBox": {
                  "left": 0.721354,
                  "top": 0.3287018,
                  "right": 0.94010484,
                  "bottom": 0.47870326
                },
                "timeOffset": "0.100s"
              }
            ]
          },
          ...
        ]
      }
    ]
  }
}
To calculate the speed of those vehicles - I used the following algorithm (PATENT PENDING 😂):
- Calculate centroids (x,y) of the bounding boxes (l,r,t,b) in the first and last frames where a car was detected.
- Calculate time difference (T) between first and last frames where a car was detected.
- Calculate relative horizontal distance travelled (r) in frame by subtracting centroid X axis values (x1, x2).
- Multiply relative horizontal distance (r) by real-world road distance (R) measured to calculate actual distance travelled (D).
- Speed = D / T 😀

Note: This calculation is obviously an approximation of the speed of the cars in the footage. The bounding boxes aren’t fixed sizes between frames for the same cars. Despite this, I did some manually calculations and found the results from this automatic method to be fairly accurate.
Producing Annotated Video Footage
FFmpeg was used to produce an annotated version of the input video file - with cars labelled with their calculated speeds. Here is the Python code I used. It reads each frame from the input source video. If any cars were detected in that frame, it overlays a bounding box using the detected vehicle coordinates and a text label with the vehicle speed.
def annotate_frames(cars_frame_lookup, input_video, output_video, frame_rate, width, height):
    src = cv2.VideoCapture(input_video)
    length = int(src.get(cv2.CAP_PROP_FRAME_COUNT))
    fourcc = cv2.VideoWriter_fourcc(*'mp4v')
    dest = cv2.VideoWriter(output_video, fourcc, frame_rate, (width, height))

    def frame_iter():
        while True:
            ret, frame = src.read()
            if ret is False:
                break
            yield frame

    frame_number = 0

    for frame in tqdm(frame_iter(), total=length):
        for idx, car in enumerate(cars):
            if frame_number in car:
                frame = cv2.rectangle(frame, box_start(car[frame_number], width, height), box_end(car[frame_number], width, height), color, thickness)
                frame = cv2.putText(frame, "car " + str(idx) + " speed: " + str(car['car_speed']) + "km/h", box_start(car[frame_number], width, height), cv2.FONT_HERSHEY_SIMPLEX, 2.0, (0, 0, 0), 4)
                centroid = bb_centroid(car[frame_number])
                coords = normalised_to_xy(centroid[0], centroid[1], width, height)
                frame = cv2.circle(frame, coords, radius=10, color=(255, 255, 255), thickness=-1)

        dest.write(frame)
        frame_number += 1

    src.release()
    dest.release()
Creating Statistics Spreadsheet
Python comes with CSV file writing support in the standard library. This makes generating a spreadsheet with the detected vehicle statistics possible like this:
to_csv = csv.writer("statistics.csv")
to_csv.writerow(["Car Detected #", "Entrance Time (s)", "Exit Time (s)", "Speed (km/h)"])
for idx, car in enumerate(cars):
    to_csv.writerow([idx, car['entrance_time'], car['exit_time'], car['car_speed']])
How To Use Software
I’ve open-source the code for this project here: https://github.com/jthomas/ai-speed-camera
Once you have recorded a video and processed it using the Google Cloud API - run the Python script.
python3 init.py --video input.mp4 --output dest.mp4 --annotations results.json --distance 32
The script takes the following parameters (mandatory parameters in bold).
--annotations: Video AI API output results file--video: Source video file (MP4 format)--output: Annotated video destination file (MP4 format)--distance: Real-world distance covered by video frame (metres)--frame-rate: Source video frame rate (default :15)--width: Source video width (pixels - default: 1920)--height: Source video height (pixels - default: 1080)--min-speed: Ignore cars with speed lower than this value. Used to ignore fixed vehicles in frame or anomolous cars detected (kmph - default: 1).--min-distance: Ignore cars which travel less than this relative distance in the frame. Used to remove anomolous cars detected (relative distance between 0 & 1 - default: 0).--export-to-csv: Export car speed statistics to CSV file (output filename)
The Python script will produce the output below whilst running. It prints the number of cars detected in the API result set and the number of valid cars (in reference to minimum speeds and distances). A progress bar will be shown during the video processing stage with estimated time left.
INFO:root:Discovered 50 total cars in annotation response
INFO:root:Discovered 12 valid cars in annotation response: 6, 7, 11, 13, 14, 21, 24
INFO:root:Exporting valid car statistics to csv file
INFO:root:Processing source video file
100%|█████████████████████████████████████████████████| 1/1 [00:00<00:00, 26.71it/s]
Future Ideas
The next step for this project would be to make it real-time. Rather than having to record videos and process them offline, the video stream should be processed and annotated live. This could be wrapped up into a mobile application to allow anyone with a mobile phone to use it. There are numerous TF models for real-time object detection which make this possible.
It would also be interesting to take the same approach for running the software on a Raspberry PI with a web cam - to turn the “virtual speed camera” into a real hardware device.
2022 Update: There is now an application by a new startup which uses a similar approach to provide a virtual speed camera as a mobile application: https://speedcamanywhere.com/.